Hello (hello, hello, hello, ...)
Not sure that anyone will see this, but just in case, I thought you might like to know that I have started a new food blog over here at A Little Bit Greedy.
I do hope that you will pop on over and say 'hello'.
Friday, October 18, 2013
Monday, October 31, 2011
Foolproof fudge

Happy Halloween!
Whilst I understand some people's reservations about Halloween (I must admit I've been fairly aghast by the inches of shelf space devoted to this somewhat dubious occasion), I do like to see kids having fun. As such, I enter into the spirit of things and carve pumpkins and stock up on goodies to offer the trick or treaters that make their way to our door. It is just seven 'o clock and already the supplies are looking a little depleated - we've had a steady stream of witches, ghosts, gouls, grim reapers and skelletons since dark descended.

First to go were the little bags of homemade fudge I made at the weekend. I've never had a great deal of success with fudge-making for some reason, but this time I've cracked it. It is a slightly cheaty recipe using condensed milk but I don't care as it tastes just as fudge should - sweet and creamy with that wonderful slightly granular texture. I'm particularly pleased that I finally decided to part with some cash and invest in a sugar thermometer (grand total £4.99). This meant I could relax and judge the moment to take my fudge of the heat by watching the thermometer rather than dropping bits into ice-cold water (...though works well too).

I'm a bit boring in that I like my fudge fairly plain - vanilla is best for me. But this recipe is easily spruced up with various additions - crystalised ginger is a winner, rum-soaked raisins another or walnuts and a dash or two of maple syrup go down well too. Chocolate chips, dried fruits or coffee are other ideas which may appeal.
Foolproof fudge
Adapted from this recipe on the Carnation Condensed Milk website
Makes approx. 60 squares

Ingredients:
1 397g tin of condensed milk
150ml semi-skimmed milk
450g light muscovado sugar (or any pale brown sugar)
115g unsalted butter
1.5 tsp vanilla extract
1. Grease and line an 8 or 9 inch square tin.
2. Tip all ingredients into a large heavy-based non-stick saucepan and heat over a low heat, stirring constantly until the sugar has disolved.
3. Bring to the boil and simmer for 10-15 minutes, stirring all the time, until the mixture has reached 'soft-ball' stage. This is when the mixture reaches 116C or when the mixture forms a soft ball when dropped into a bowl of ice-cold water.
4. At this stage, remove the pan from the heat and beat for around ten minutes until the mixture has become thick (but pourable/scrapable) and grainy.
5. Pour and scrape into the prepared tin and leave for an hour or so to set before cutting into squares.

Thursday, October 20, 2011
Bengali yoghurt fish - Anjum Anand

Just back from a fabulous fortnight holiday in Madeira - perfect weather, lots of relaxing and far too much food. Madeira is perhaps not the greatest of foodie destinations but we ate very well whilst there and enjoyed the wonderfully fresh produce available to us.
More on Madeira at a later date, but for now I want to talk curries. My husband is a huge curry fan and, I have to say, that I'm pretty keen too. This was not always so. As a youngster I shunned anything with the remotest kick and steered well clear of all spicy food. It wasn't something we ate at home and it took some time before I changed my ways and started to experiment. It was some years before I began to understand that curry does not necessarily equal hot! The curries we enjoy eating at home are never 'hot'. They have outstanding flavour from the many different spices involved and sometimes a little heat from chilli, but rarely do we break a sweat.
I have a personal love of Thai curries and I can never resist a really good Thai green curry, ubiquitous though it may be. It was a staple of my university days and a dish I suspect I will always cook. I also tend to lean towards mild, creamy curries enriched with coconut milk or yoghurt. But this isn't to say that they are always unhealthy. When cooking curries, we try to choose lighter, less-fattening ingredients and add lots of vegetables.
Last Christmas, in order to be a little more 'authentic' in our curry-making, I bought my husband a lovely book by Anjum Anand. 'I love curry' is a modern mouthwatering collection of curries and accompaniments. Every dish is photographed and Anjum includes a nice introduction for each recipe explaining how each recipe evolved. Best of all, her recipes tend to the lighter side. They are not swimming in oil or ghee and are the majority of recipes are fragrant and delicately spiced though she had some more punchy powerful curries too. She also explains the different stages involved in creating an authentic curry and how to balance the final dish (how to add heat, 'tame the flame', add sweetness or acidity etc...).
We tend to cook mainly meat or vegetable-based curries but recently we tried our hand at one of the many fish-based curries. I used to live with someone with Indian roots who made the most fabulous fish curry (a family recipe handed down over the years) - somewhere she gave me the recipe and I must find it to re-create it. In the meantime though, this did very nicely. The flavours were delicate and aromatic and it made a lovely mid-week dish.
Here is the recipe, with a few tweaks (mainly using slightly less oil and our preferred amounts of chilli - Anjum always gives a choice so you can alter a recipe to taste.
Bengali yoghurt fish
Recipe adapted from 'I love curry' by Anjum Anand (p83)
Serves 4 but easily halved
Ingredients:
3 tbsp vegetable oil
1 small onion
10g peeled weight of fresh ginger
2 plump garlic cloves
1/4 tsp chilli powder
2 tsp ground coriander
2 green whole green chillis, stalks removed
2 small tomatoes
2 heaped tbsp Greek yoghurt (we used low-fat variety)
600g firm white fish fillets (we used cod)
Handful fresh coriander
1. Finely chop the onion, grate the ginger and garlic to a paste. Blend the tomatoes to a puree in a blender and set aside.
2. First, make the sauce. Heat the oil in a saucepan or casserole. Add the onion and cook until soft and golden. Add garlic and ginger pastes and cook for a few minutes, stirring often. Stir in the spices and whole green chillis and season with a little salt. Pour in the pureed tomatoes and 150ml water and cook until liquid has evaporated and sauce starts to take on a rich, dark red colour, stirring all the time. Stir in the yoghurt until well blended.
3. Pour in a further 200ml of water and bring to a gentle boil - simmer and stir for around 5 minutes until the sauce has the consistency of single cream. Taste and adjust seasoning with more salt or chilli powder.
4. Chop the fish into fairly large chunks and add to the sauce - shake until the fish is coated. Cover the pan and cook gently for around 3-5 minutes (depending on thickness of fish) until the fillets are cooked through. Sprinkle with chopped coriander and serve with rice.

I thoroughly recommend other recipes in this book and can't wait to try others. Next on the list are a tamarind duck curry, a hearty meatball and pea curry and aubergine in a creamy peanut sauce. The tarka dhal is one of the best I've tasted and there are great ideas for accompaniments, chutneys and starters
Saturday, September 17, 2011
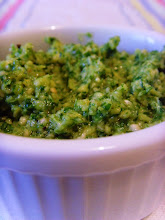
Chinese plum sauce

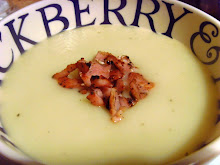
More plums courtesy of my colleague. This time I made a gloriously glossy Chinese plum sauce. Flavoured with ginger, garlic and star anise, this sauce will have add oriental flavour to many dishes over the coming months. It is brilliant as a dipping sauce or to serve with crispy duck pancakes, but there are more imaginative ideas too. No doubt I'll be using it as a base for many a stir-fry, but I'll also try using it as a baste for a pork joint and a glaze for roasted ham.
So far I've used it twice to make a delicious sauce to serve with duck breasts. Just heat in the pan you've seared the duck breasts in (minus the fat), add a little water to thin and bubble for a bit before pouring over the duck. It is so handy to have homemade sauces in the cupboard for nights when time is short - the duck dish makes a great dinner party main course with minimal effort. Roasted baby potatoes and carrots pureed with a little ginger and cumin went really well alongside.

I researched various different recipes, but eventually chose one from my favourite preserving book which is written by Thane Prince. It is called 'Jams and Chutneys - Preserving the Harvest'. As well as jams and chutneys, it also has great recipes for drinks, sauces, pickles and jellies. The recipe makes around 1 litre of sauce and keeps for up to a year. Decanted into pretty bottles and tied with a lovely ribbon, this sauce would make a lovely Christmas present for a foodie friend or a nice alternative to a box of chocolates when visiting friends for dinner.
Chinese Plum Sauce
From 'Jams and Chutneys - Preserving the Harvest by Thane Prince'

Ingredients:
750g white onions
Cloves from 1.5 heads of garlic
20cm piece of ginger
250ml light soy sauce
1 litre rice wine vinegar (not to be confused with rice wine)
1kg light muscovado sugar
6 star anise
1. Firstly, prepare all the ingredients. Roughly chop the onions and garlic. Peel and chop or grate the ginger. Grind the star anise in a pestle and mortar.
2. Halve the plums and remove the stones.
3. Put all ingredients except for star anise and sugar into a preserving pan. Bring to the boil and simmer for 20 minutes until the ingredients are very soft.
4. Push the mixture through a fine metal sieve - hard work!! If you have a mouli, you'll be grateful as it will make much shorter work of this somewhat tedious and surprisingly strenuous task. Push through as much as you possibly can.
5. Return the sieved mixture back to the cleaned pan, add the sugar and ground star anise and bring to the boil, stirring all the time as the sugar dissolves. Simmer for 30-60 minutes until you have a thick, glossy sauce. Pour into sterilised bottles and label when cool

Wednesday, September 07, 2011
Blackberry and almond tart

The end of summer has brought with it a host of new cook books to browse and devour and I've been lucky enough to receive several new titles to drool over. I'm thrilled in my new house to have all my cook books in one place and easily accessible. I have a fairly obscene number and should, no doubt, have some kind of amnesty, but I can't bring myself to part with a single tome. Browsing through the new titles (thank you Octopus Publishing and Innocent) led me to consider what it is that I really like in a cook book. And the things that I don't like.
What I do like?

1. Pictures, pictures and more pictures. I like to see a picture of the 'finished dish'. As much as I am an imaginative sort, it is usually the pictures that seduce me and lead me from reading to cooking. My one key caveat here is Nigel Slater with his Kitchen Diaries. His writing is so evocative that I'm prepared to forgo the pics and head for the kitchen regardless. But usually, I need pictures. And this, as I mentioned, means pictures of the food. Not pictures of the cook, her glamorous home or even the ingredients. But pictures of the food being cooked. Pictures of the finished dish. I want to see onions sweating in a pan. Fluffy meringue. Wobbly jellies. Crispy-skinned duck. Steaming bowls of stew.
2. Recipes I can actually imagine cooking. For me this means recipes easily-achievable for the home cook. Things I might actually cook for supper rather than things I'd go to a fancy restaurant to eat. Much as I might enjoy foams, froths and liquid nitrogen in my local gastro-destination, I'm happy to stick with somewhat simpler techniques at home.
3. Options. I love recipes with options and ideas. When it says 'if you don't fancy chicken, why not try this with rabbit'. 'If you've forgotten to buy the cider, you can use apple juice/white wine/stock'. If you've some leftover, add some cream and make a pasta sauce/chop it up and use as a base for trifle/add potato and fry to make a rustic hash'.
4. Tips. Along with options come tips. Particularly ones about which bits to make in advance. So useful. Freezing tips also welcome. Tips for peeling butternut squash also invaluable.
What do I dislike?
1. Recipes which haven't been properly tested in a home kitchen. Celebrity chefs are the main culprits here. I find all too often that their recipes simply don't work well. I find recipes created, developed or tested by home economists or home cooks do work well.
2. Poor proof reading. Don't get me started. This is one of little 'things'. Totally excusable in a speedy blog post but in a book that has taken months to prepare? No excuse at all. I'm sorry. As I say, it is one of my 'things'!
3. Too many photos of the chef and/or his/her home/children/friends/pets/lifestyle. Just show me the food please!
4. Faddy books that are too specialist and fly-by-night. I prefer my cook books to be more of the timeless sort that I'll return to again and again over the years.
So. I must admit that it was with a touch of cynicism that I picked up Tana Ramsay's new book 'I love to bake'. The front features a combination of admittedly tempting shots of the sort of food I like to eat and slightly nauseating photos of Tana herself posing in the kitchen looking serene and domestic-goddess-like. I must confess that I've not taken much interest in Tana's other books and have perhaps dismissed them assuming that she is simply cashing in on her husband's fame.
I was very pleasantly surprised. As I flicked through the book I found recipe after recipe that I really fancied trying and plenty of food photos to inspire me (albeit interspersed with a few too many of the author herself and her photogenic family!). The book is about baking in the widest sense. Yes there are cakes, pies and breads. But Tana's baking also extends to lamb hotpot, baked tomatoes, mackerel fishcakes and a stunning-looking salmon en croute with minted pea and bean puree. Lots of great family dishes and recipes that kids can get involved in creating.
For those with a sweeter tooth (me included), there is plenty to tempt. From classic favourites (custard creams and baked apples) to more original offerings (hot apricot and pistachio souffles and mulled wine, plum and blackberry pie), there are dozens of appealing recipes. Despite her fondness for dessicated coconut (something I cannot abide) I'm taken in by Tana's relaxed, simple, wholesome style of cooking.

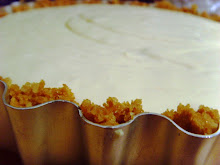
The day after receiving the book, I had my sister and her two boys for lunch. Perfect excuse to cook up a blackberry and almond tart. This tart combines a crisp dessert pastry shell with squidgy frangipane and autumnal blackberries. A winning combination but oddly one that I've not tried before. I must confess that for speed I used a good quality ready-made pastry but otherwise followed the recipe to the letter. It worked brilliantly - I was particularly impressed with the idea of brushing the pastry shell with beaten egg after blind baking and returning to the oven for 5 minutes to crisp up the pastry. Worked a treat! I would add that the tart is very versatile and would be great with raspberries, plums or other reasonably tart fruit.
This recipe is truly delicious and I urge you to try it. Tana's book has surprised me and I can see myself trialling quite a few of the recipes of the next few months.
Almond and Blackberry Tart
In my own words. For exact recipe, please see Tana Ramsey's 'I love to bake' published by Octopus Books.

Ingredients
350g dessert pastry (recipe can be found in the book)
200g blackberries
175g unsalted butter
150g caster sugar
200g ground almonds
2 large free range eggs, lightly beaten
1 unwaxed lemon
1. Lightly grease an 8.5 inch loose-bottomed tart tin and line the base.
2. Roll out the pastry on a floured surface until the thickness of a £1 coin. . Line the tart tin, pushing into the corners. Prick all over with a fork and pop in the fridge to chill for at least 45 minutes.

3. Pre-heat the oven to 180C. When chilled, line with baking paper and fill with baking beans. Bake blind for 15 minutes and then take out of oven and remove the beans and baking paper. Brush the case with a little of the beaten egg and return to the oven for a further 5 minutes, until slightly golden.
4. Whilst the case if cooking away, get started on the frangipane. Pop the butter and sugar in a food processor or mixer and beat until pale and fluffy (use a paddle attachment if you have one). Mix in ground almonds and then add the beaten eggs and lemon zest, a little at a time.
5. Pour the frangipane into the tart case and then arrange the blackberries in the mixture - pushing down into the the gloop. Make a pretty pattern, if you can!

6. Bake in the oven for 35-40 minutes until the frangipane is firm to the touch and springs back slightly. Remove and cool on a wire rack for 15 minutes or so. Serve warm with vanilla ice-cream or cream.

Friday, August 26, 2011
Plumbrillo

After a chaotic couple of months, we are installed in our new house and settling into our new village. Now that I'm feeling a bit better (thank you for all the good wishes) and have unearthed the kitchen equipment, I'm back to the stove and cooking away.
I was a little sad to leave the fabulous garden at our rental property complete with its many fruit trees. The plums were just ripening as the time came to leave and I hated to leave them on the tree for the next tenants. No need to worry though. As fortune would have it, I share an office with someone currently faced with a serious glut of plums. Last week I came home laden with four bags full of the little beauties and with a head full of ideas for transforming them into delicious treats. Four kilos of plums is quite a few to deal with. Especially considering that I'm not especially fond of stone fruit (odd, I know - it is a textural thing). I do love the flavour of plum though so I was keen to preserve the flavour whilst losing the fleshy texture I'm less fond of.

First up was this superb accompaniment to cheese. Plumbrillo is a fruity take on the superb membrillo which is often served alongside Manchego cheese. It is essentially a fruit 'cheese'. A thick, almost jelly-like confection which slices neatly and goes well with lots of cheeses.
It is easy to make and looks very impressive with its gleaming plum-red colour. The only hard part is pushing the cooked plums through a metal sieve. Next time I think I'll invest in a mouli which would make this job much less time-consuming! Whilst this looks best set into small moulds and turned out onto the cheese board, I actually poured most of mine into sterilised jam jars. This way it will keep for up to 6 months and will make nice presents at Christmas time. If you can find small, ramekin-shaped jars, these would be perfect.
I found the recipe on the BBC Good Food website, a great favourite recipe source.
Plumbrillo
Enough to fill approx. 7 small jam jars

Ingredients:
2kg ripe black or red plums
1kg jam/preserving sugar
1. Wash the plums. Quarter and stone all fruit and place in a large preserving pan along with 500ml water.
2. Bring to boil and simmer for around 45 mins until the plums have completely cooked down and are pulpy and dark.
3. Now for the hard bit! Pour the plums into a large bowl. Rinse out the preserving pan and then push the plum mixture through a nylon sieve (or use a mouli) into the cleaned pan. Try to extract as much of the pulpy flesh as you possibly can.
4. Stir in the sugar and heat, stirring all the time until the sugar dissolves. Turn up the heat and bring to the boil. Bubble for approx 25 minutes until you have a thick puree. The mixture is ready when a wooden spoon leaves a trail along the bottom of the pan for a second before the puree floods the gap.
5. Pot into sterilised pots or jars and seal. Leave to set and cool before labelling. Keep in a cool dark place for up to 6 months.

Wednesday, July 06, 2011
A pause

I've had a pause and I'm going to continue pausing for a little while.
I've had some health problems over the past few months and I'm still trying to get to the bottom of them. Nothing serious hopefully but it all centres around my stomach meaning that food-related reading and writing have been a little... off the menu. I'm fed up of feeling permenantly queasy and uncomfortable and, worst of all, the whole thing has put me off one of my very favourite pleasures in life... food! It is hard to enthuse about the cooking when you don't feel much like eating.

On the better days, I have been busy in the kitchen and there is actually much to report. I hope to get back to it very soon. But first, we have the small matter of a house move. We have finally found a permanant home (after a ten month stop-gap) so I'm currently surrounded by packing boxes for the second time in twelve months. It will take a while to get back online but I expect to be back to blogging in a few weeks time!
In the meantime, I hope you like these pictures I took the day my pup, Sinbad, was momentarily reunited with his sister, Bramble, who has spent the past year living in Germany.

Two peas in a pod!
Subscribe to:
Posts (Atom)